Are you one of the users of Vuse vape products? Using any of the models of Vuse like Alto, Solo, or Vibe? Then you are familiar with what we are targeting to solve. But;
Table of Contents
Short Historical Disclaimer
Before we start, Have you heard of Socrates? Who was served hemlock and sentenced to death? His life was as terrible as his own wife beat him. Once he was asked by a young fellow about how he had turned into a philosopher.
The answer was a straight hint about, you need a bad wife to face your life as an exception. You need a bad wife to become a philosopher.
Now, why did we tell you this? The reason is, when you have a device with some issues, you will certainly generate unique ideas to normalize it for your use.
And very similar to that, it is very frequent that people are asking how they can charge their Vuse cart or dab pen without the dedicated charger.
If you are connected with tech communities, you may be familiar with charger and battery exploding videos and photos. And the thing very common here is, they use some DIY tricks which go wrong or use of some unauthorized or third-party charging accessories.
And the crucial truth is, the company won’t provide you a warranty for your self-made damage. So, you gotta buy new devices.
Now, the main fact is, if you don’t have the appropriate charger for your Vuse with you.
What are you gonna do? Buy a new Vuse charger or have a few minutes for a DIY project?
If you are the person for the second option, we recommend you to take the complete preparation for the further DIY processes.

How To Charge a Vuse Without a Charger – Preliminary Preparations
- Set up a video camera or smartphone for capturing the whole moment. We recommend enough light for your work. The advantage of recording the procedure is, you have a clear view of what you are doing and if something goes wrong, you gotta have a clear idea to turn it reverse. Also, you are preparing a proper DIY tutorial video which you can use for one credit.
- For every experimental work, having a plan B is always a wise idea. If anything goes wrong, you can easily turn to the emergency other option harmlessly.
- You need to find some phone charger leads for further processes. Also, keep a sharp knife with you. This will be needed.
- The very final thing you need to do for preparation is, ask yourself if you really want to do that or not. If yes, you are for the next ones.
You Will Need
- Working Charger cables. (USB-C/Android Charger, Micro USB/Android Charger, Lightening/iPhone charger, depending on the smartphone you use)
- A wire cutter will be vitally necessary.
- If you are trying for the very first time, we recommend keeping 2 wires for safe backup. If you spoil one on the time of the first try, you can use the other one for the next attempt.
Before you jump into the steps, you need to know some precautions and bad sides that may happen to you while applying the steps. As this is a nicotine-based product, it has highly flammable instruments inside. So, risky steps without proper precaution are highly prohibited. We are placing those precautions at the end of the passage.

But make sure you read them before applying the steps.
Ready, Steady, Go!
- Take the wire you kept and cut the mobile output side with the wire cutter.
- You need t cut the shell of the wire and take out the wires inside it. You can probably find two cables, one black, and the other red.
- Safely expose the core of the cables.
- Now hold your Vuse device in your hand, the charging light and brand name should be on the above side.
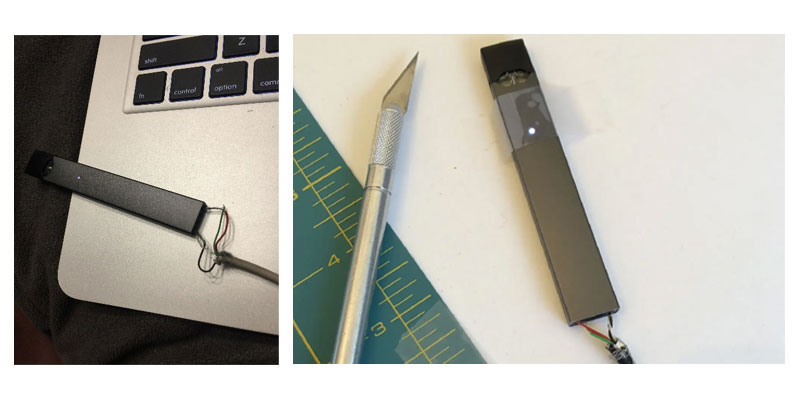
- The Black Wire will be connected at the left of the centered connection point. And the Red Wire will be to the centered one. Look at the photos below for easier identification.
- If you haven’t done any mistakes, your default charging sign Green light will be shown. So, the device is successfully charging.

Precaution and Risks
- While you are exposing the cores of the cables, be very much aware of how much pressure you are giving. Giving extra pressure may damage the core of the line which will, in the end, create a lack in voltage and slower charging as a result.
- If you cut the wire and found there are different colors than red and black. Try to find out the negative and positive cables by reading the labels on the wire. Once you found it, consider the Negative one as the black cable and the Positive one as the Red cable.
- While you are connecting the wires to your Vuse, the position should be just like the photos we included above.
- Keep in mind, if you put your Vuse e-pod in the wrong position, the wires might get connected to the wrong place which may create electric sparks and explosions. In fact, the reason behind most of the explosions is the wrong wire connection and placement. So, be highly secure about this.
- And while the device started charging, showing you the green light, do not shake or move the device much. You gotta know that you are connecting your Vuse with a very insecure connection. If it makes many movements the connection will be detached and even there is also the same risk of damage and explosions.
But what if you have a question if there are some other ways to charge your vape without the charger, The answer is absolute Yes! But not all of those are applicable for Your Vuse Alto, Solo, or Vibe devices.
Not your vape has some universal charging ports. So, it may get difficult if you keep trying unauthorized third-party techniques.
You can say, all the techniques beyond the official charging dock are third-party stuff.
Yes, it is, but The technique we have provided to you is tested and the safest of all those you find randomly on the internet and forums.
So, we recommend you not to try unauthorized and non-tested techniques without proper surveillance. That might be risky for your device and even you.
So, that’s all we had for you, hope you don’t face any trouble anymore regarding this.